MagickVoice Help Center — Campaigns
Recordings
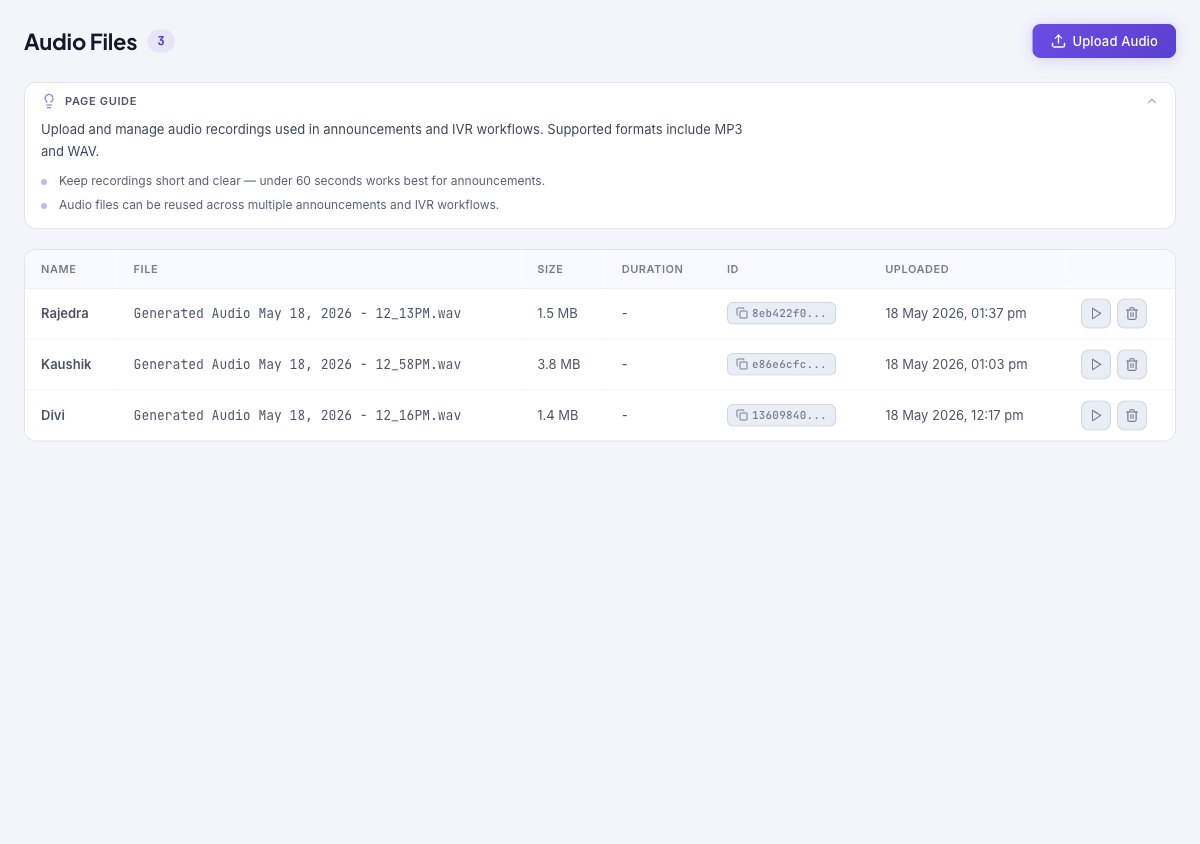
Upload and manage the audio files that voice messages and phone menus play. Supported formats are MP3, WAV, OGG, and M4A; each file can be reused across multiple voice messages and phone menus.
Audience: Campaign creators · Page address: /app/audio-files · Your admin may need to enable this feature
Common tasks
- Upload an audio file
- Play a recording to check it
- Reuse a recording across campaigns and menus
- Delete an unused recording
How to use this page
1. Understand what recordings are for
Know how audio files fit into campaigns so you upload them at the right time.
- Recordings are the audio files that a voice message or a phone menu plays when someone answers.
- A single file can be reused across multiple voice messages and menus, so you upload it once and point at it wherever you need it.
- Supported formats are MP3, WAV, OGG, and M4A. Keep recordings short and clear — under 60 seconds works best for an announcement.
- Use the page guide for a refresher, and Hide page guide to collapse it.
2. Review your recordings
See what audio is available before creating a voice message or menu.
- Open Recordings from the sidebar. The table lists each file with its Name, File name, Size, Duration, an ID, and the Uploaded date.
- Select Play on a row to listen and confirm the audio is correct before you use it.
- Confirm you are in the intended tenant (top bar) — recordings belong to the tenant they were uploaded in.
3. Upload an audio file
Add a recording so a voice message or phone menu can play it.
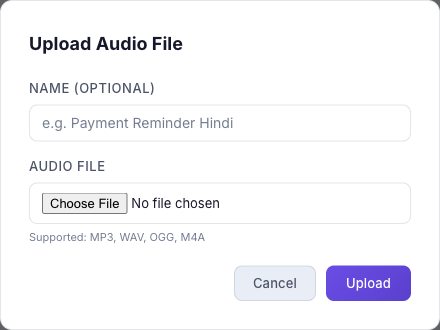
- Select Upload Audio. The Upload Audio File form appears.
- Optionally set a Name so the file is easy to identify later; otherwise the original file name is used.
- Choose the audio file. Supported formats are MP3, WAV, OGG, and M4A.
- Select Upload. The file appears in the table, ready to attach to a voice message or a phone menu.
4. Remove a recording
Clear out audio you no longer need.
- Select Delete on the recording's row.
- Deleting removes the file from this list. Make sure it is not still referenced by a voice message or phone menu you rely on before removing it.
Tips and troubleshooting
- Review campaign settings before dispatch because recipient mistakes can be expensive to unwind.
- Use analytics after delivery to compare completion, failures, and response trends before sending the next batch.
- Keep recordings short and clear — under 60 seconds works best for an announcement.
- Upload the audio here first, then attach it to a [voice message](/docs/voice-messages) or a [phone menu](/docs/phone-menus).